
30 Best Out of Waste Ideas for Kids: Build useful things in 2022
Connecting arts and crafts to children at a younger age are vital. This will be important because they will learn a new skill and help save the environment by utilizing the waste material and creating something best out of waste.
Top 30 Best Out of Waste Ideas for Kids
Here is a list of the top 30 Best Out of Waste for Kids that we have compiled for teaching your kids:
1. Painted Glass Bottle
You will need the following items:
- Any well-shaped bottle
- Syringes
- Paints based on oil
Best out of Waste steps for Painting a Glass Bottle:
- Kids can perform this task by making sure they wear clothes that are not in use.
- Wash the bottle from the inside as well as from the outside, and let the bottle dry.
- Take the syringe, pack it with paint, and press it into the bottle; shake it well so it reaches every corner.
- When the color has covered every corner of the bottle, place in Oven at 302 degrees Fahrenheit for approximately 35-40 minutes.
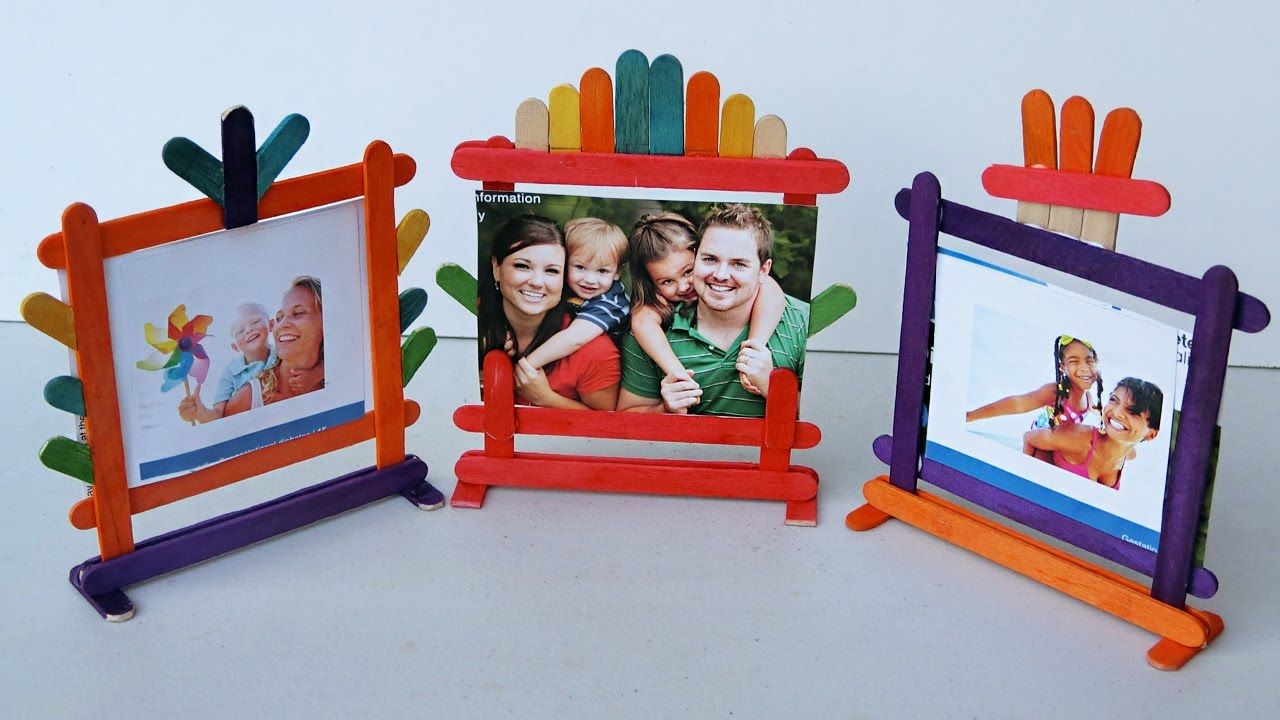
2. Popsicle Photo Frame

You will need the following items:
- 9 *12 white papers
- 8 Popsicle sticks
- Scissors
- Glue gun
- Paint
- Crayons
Best out of Waste steps for Popsicle Photo Frame:
- Color the Popsicle sticks in different colors of your choice.
- Use two popsicles on both sides.
- You can either draw or attach a picture of your choice on the white paper.
- Glue the Popsicle sticks in a square. It will create the frame. This handmade best out-of-waste material craft for kids will always hold a unique charm.
3. Shoebox for Storage
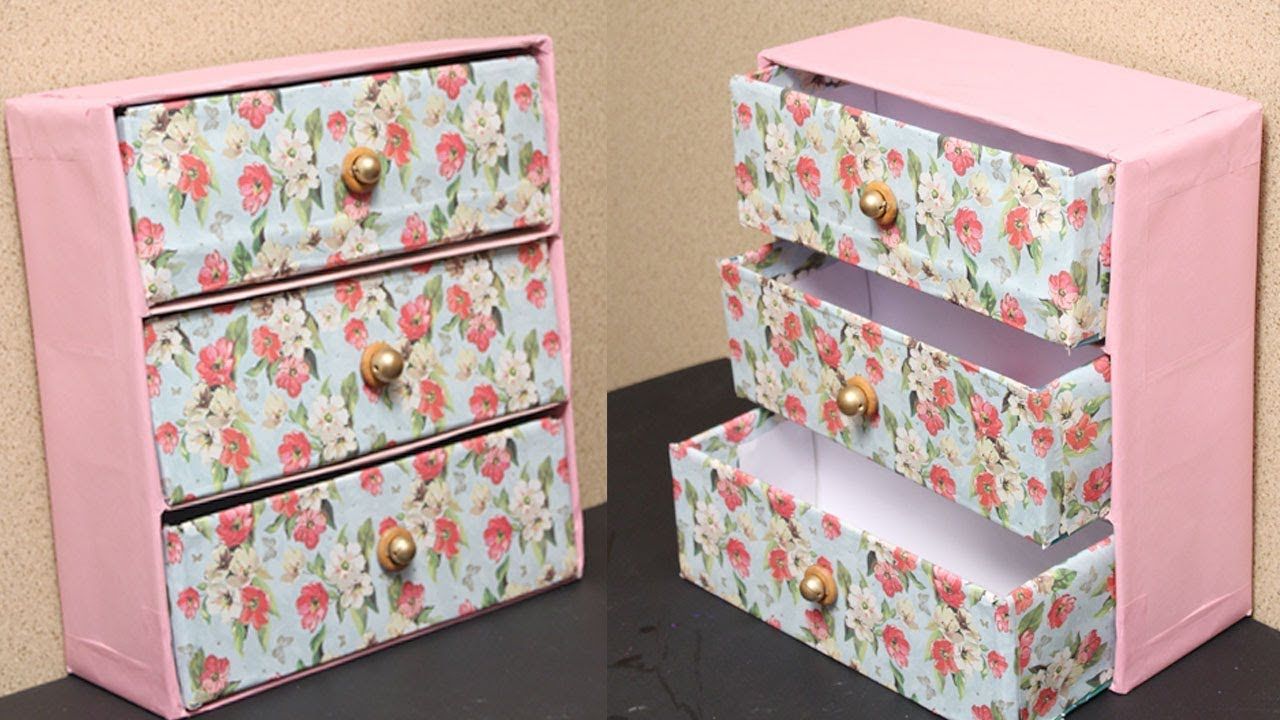
You will need the following items:
- Shoebox
- Tape
- Marker
- Cartoons from the newspapers/articles
- Glue
- Scissors
Best out of Waste steps for Shoebox for Storage:
- Cover the box with cuttings of comics from the newspaper/articles.
- Seal the box with Tape from inside.
- Try to create an attractive image of the cuttings at the top of the box to create some beautiful effects.
- Take a soda can and crush it and make it flat (adults need to perform this step)
- Place the flattened soda can at the top of the box and write whatever you want, and it’s done. I hope you liked this best out-of-waste craft idea.
4. Sock Puppets
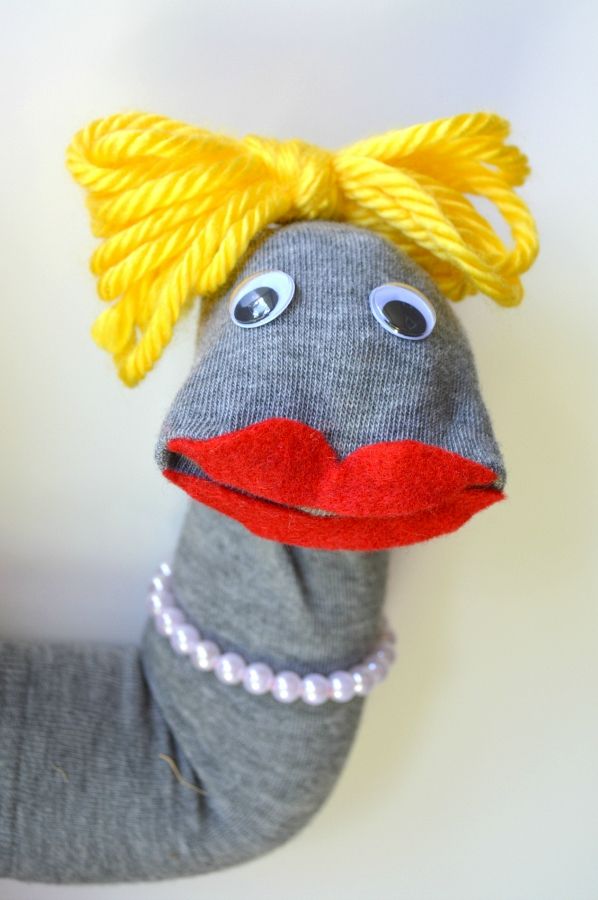
You will need the following items:
- 2 Socks
- Buttons
- Wool
- Black thread
- Wool needles
- Sewing needles
- Scissors
Best out of Waste steps for Sock Puppets:
- Wash the socks.
- Sew the buttons on the sock.
- Cut 12 pieces, 6-inch strips of wool for the hair of the sock puppets. You can make partings in the hair using a sew.
- Sew the sock from above the eyes. Your puppet is ready.
5. Bookmarks
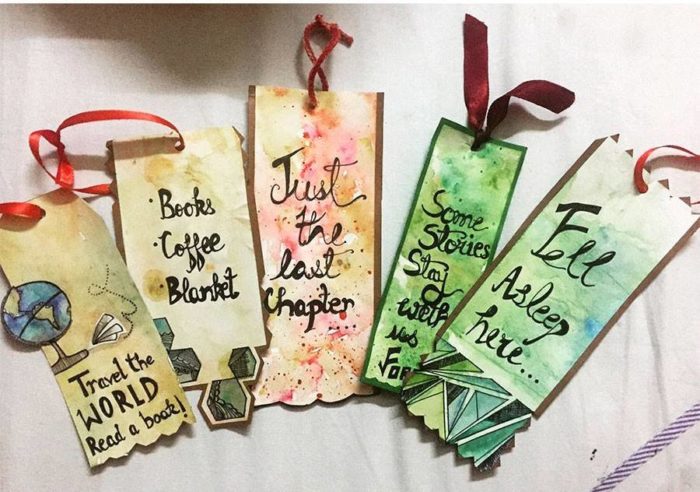
You will need the following items:
- Craft sticks
- Watercolors
- Painting brushes
- Fevicol
- Pencil or pen
Best out of Waste steps for Bookmarks:
- Draw your favorite character you like.
- Use a brush to paint details on the character.
- Decorate the drawing.
- Leave it to dry for some hours.
6. Tin Can Lanterns
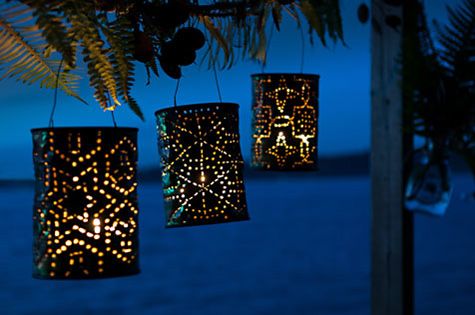
You will need the following items:
- Tin cans
- Hammer
- Wire
- Nail
- Pliers
- Tea light candle
- Spray paint
Best out of Waste steps for Tin Can Lanterns:
- Clean the can from the outside.
- Fill the can with water and leave it in the freezer for a few days.
- Now make holes using nails and a hammer. You can even make the design before making holes.
- Take a 12-inch piece of wire and make a hook by curving it.
- Stick the handle.
- Let your kids paint cans in various colors. Coat the paint in layers. Do not forget handles.
- Once the paint dries up, place tea candles inside and light them up.
7. Cork Photo Frame
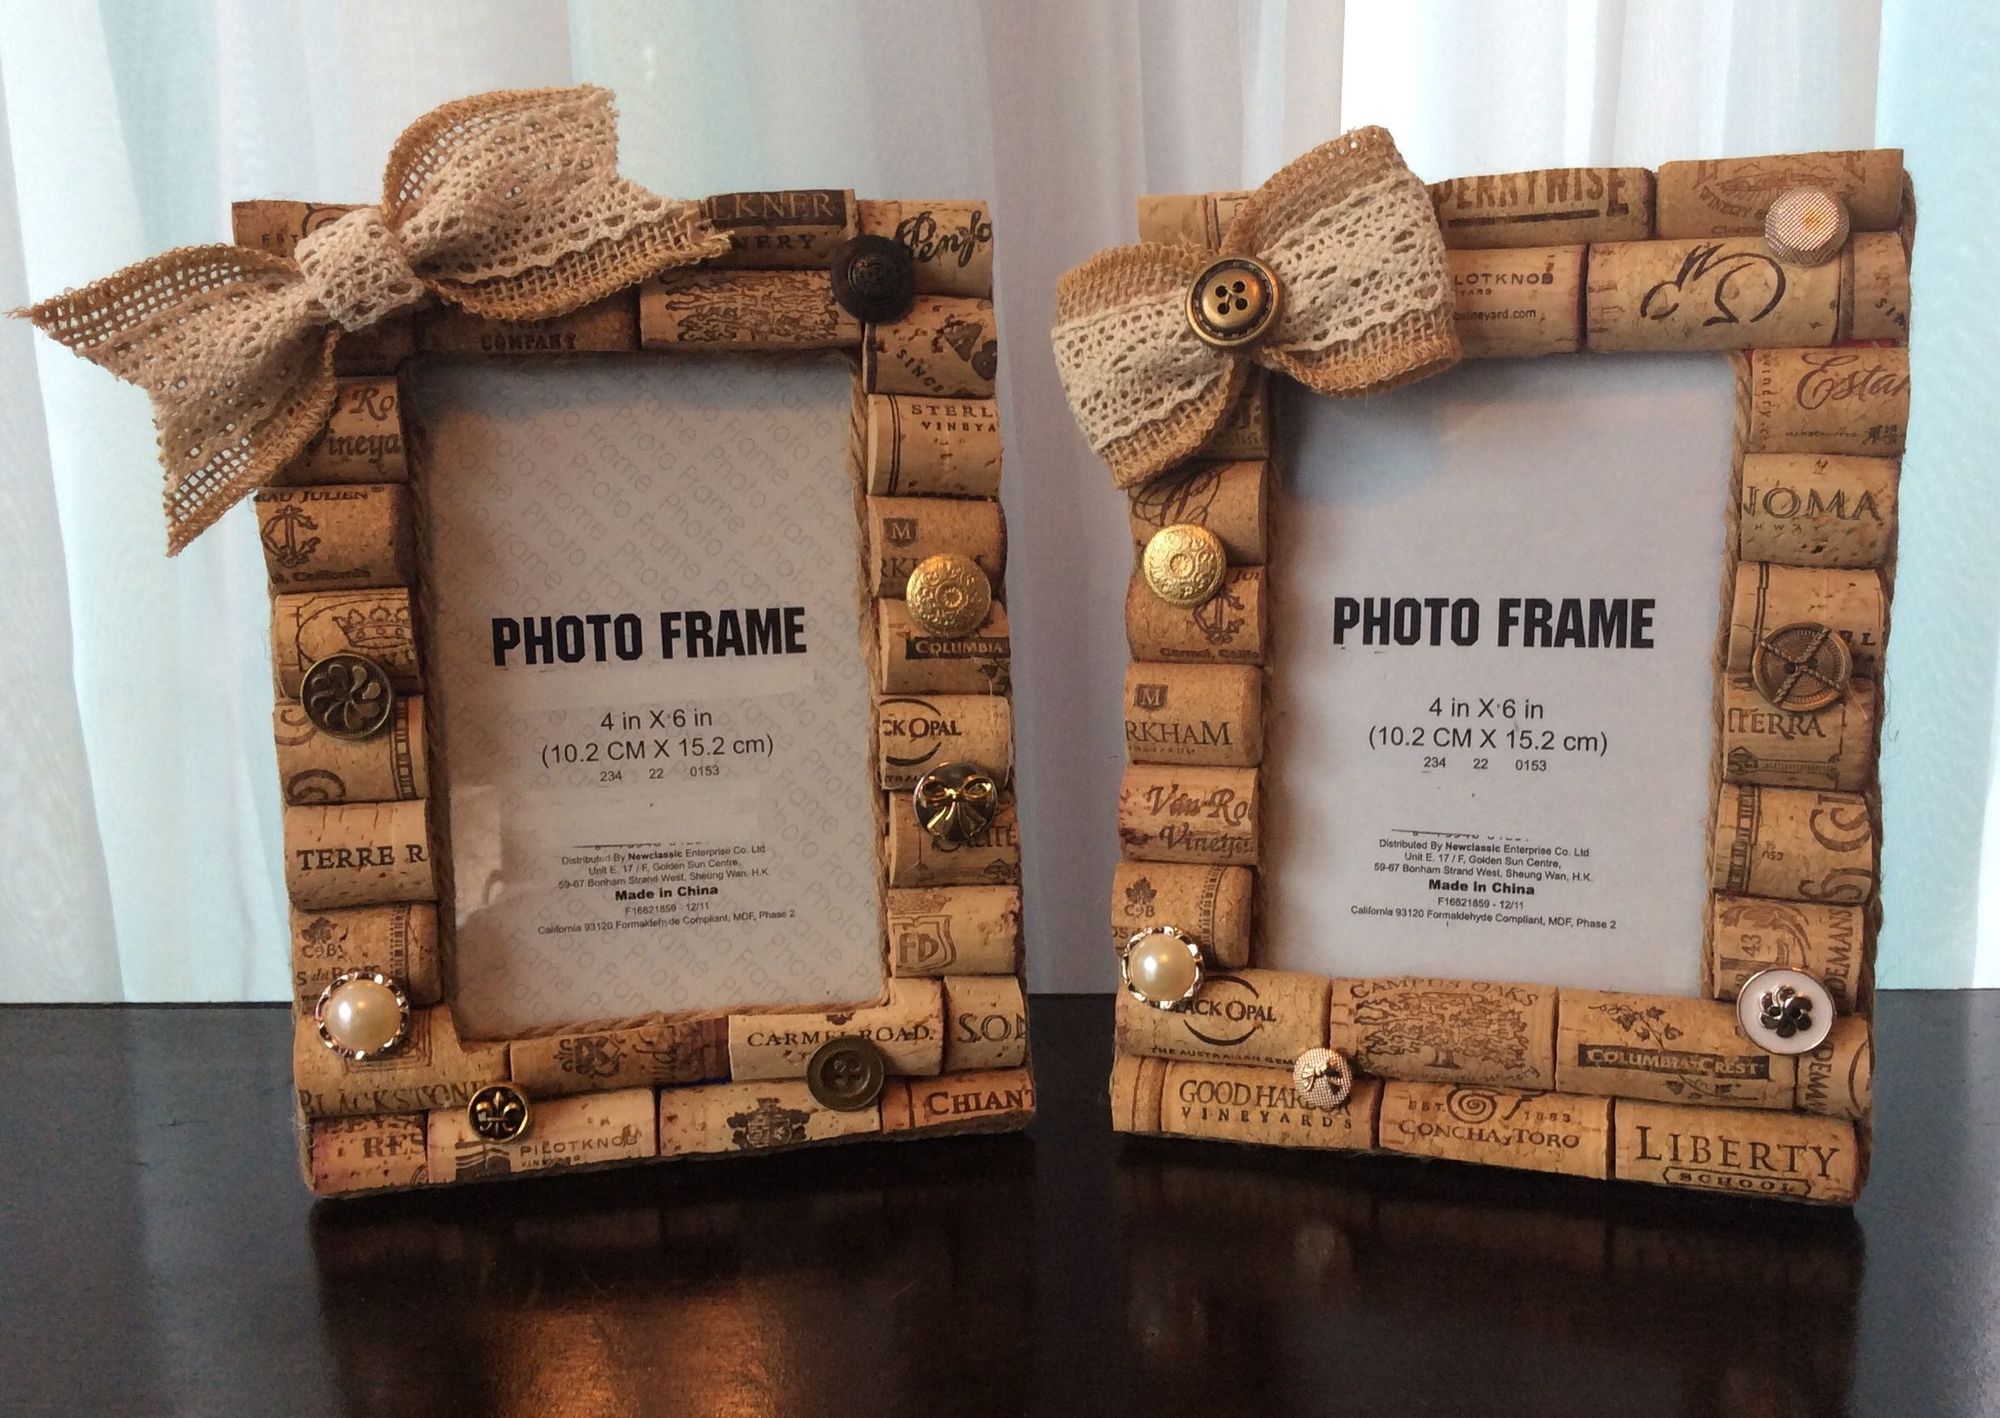
You will need the following items:
- Acrylic paints in various colors
- Paintbrushes
- Wooden frame
- 15-20 wine corks
- Fevicol
- Box cutter
Best out of Waste steps for Cork Photo Frame:
- Paint the frame in any color. Pain the frame in 2-3 coats. Let the frame dry for some time.
- Cut the corks into ¼-inch pieces using a cutter.
- Paint the pieces in different colors. Let it dry.
- Stick the corks to the frame, starting from the corners.
8. Glittery CD Fish

You will need the following items:
- A CD
- Glitter
- White adhesive/ Glue
- Any color card paper
- Tape
- Scissors
- Button
Best out of Waste steps for Glittery CD Fish:
- Apply Fevicol to the CD thoroughly, only leaving the center part empty.
- Spray glitter all over the CD. Let it dry.
- With the card paper, cut the fish's mouth, fins, and tail and paste these on one side of the CD using tape.
- Attach the button to look like an eye to one side of the fish’s face.
- Your CD fish is ready.
9. Spoon Vase
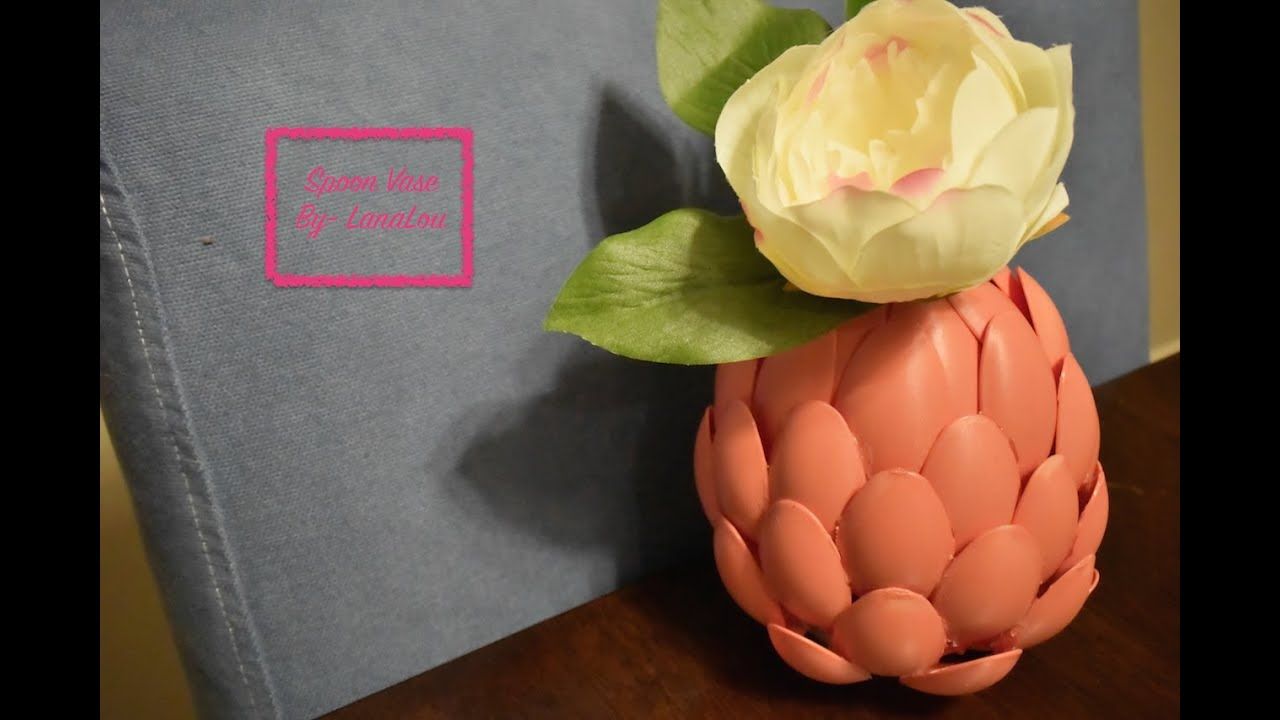
You will need the following items:
- One large can
- Paper plates
- Plastic spoons
- Scissors
- Glue
- Primer Paint
- Acrylic paints
Best out of Waste steps for Spoon Vase:
- Use white primer and paint the can.
- Cut handles of the plastic spoons.
- Paint the spoon heads in any color you like. Make sure you paint sufficient spoons required to cover the can. Let them dry for some time.
- Paste the dried spoons into the can in layers.
- Your Spoon Vase is ready.
10. Convert Old Photo Frame into a Tray
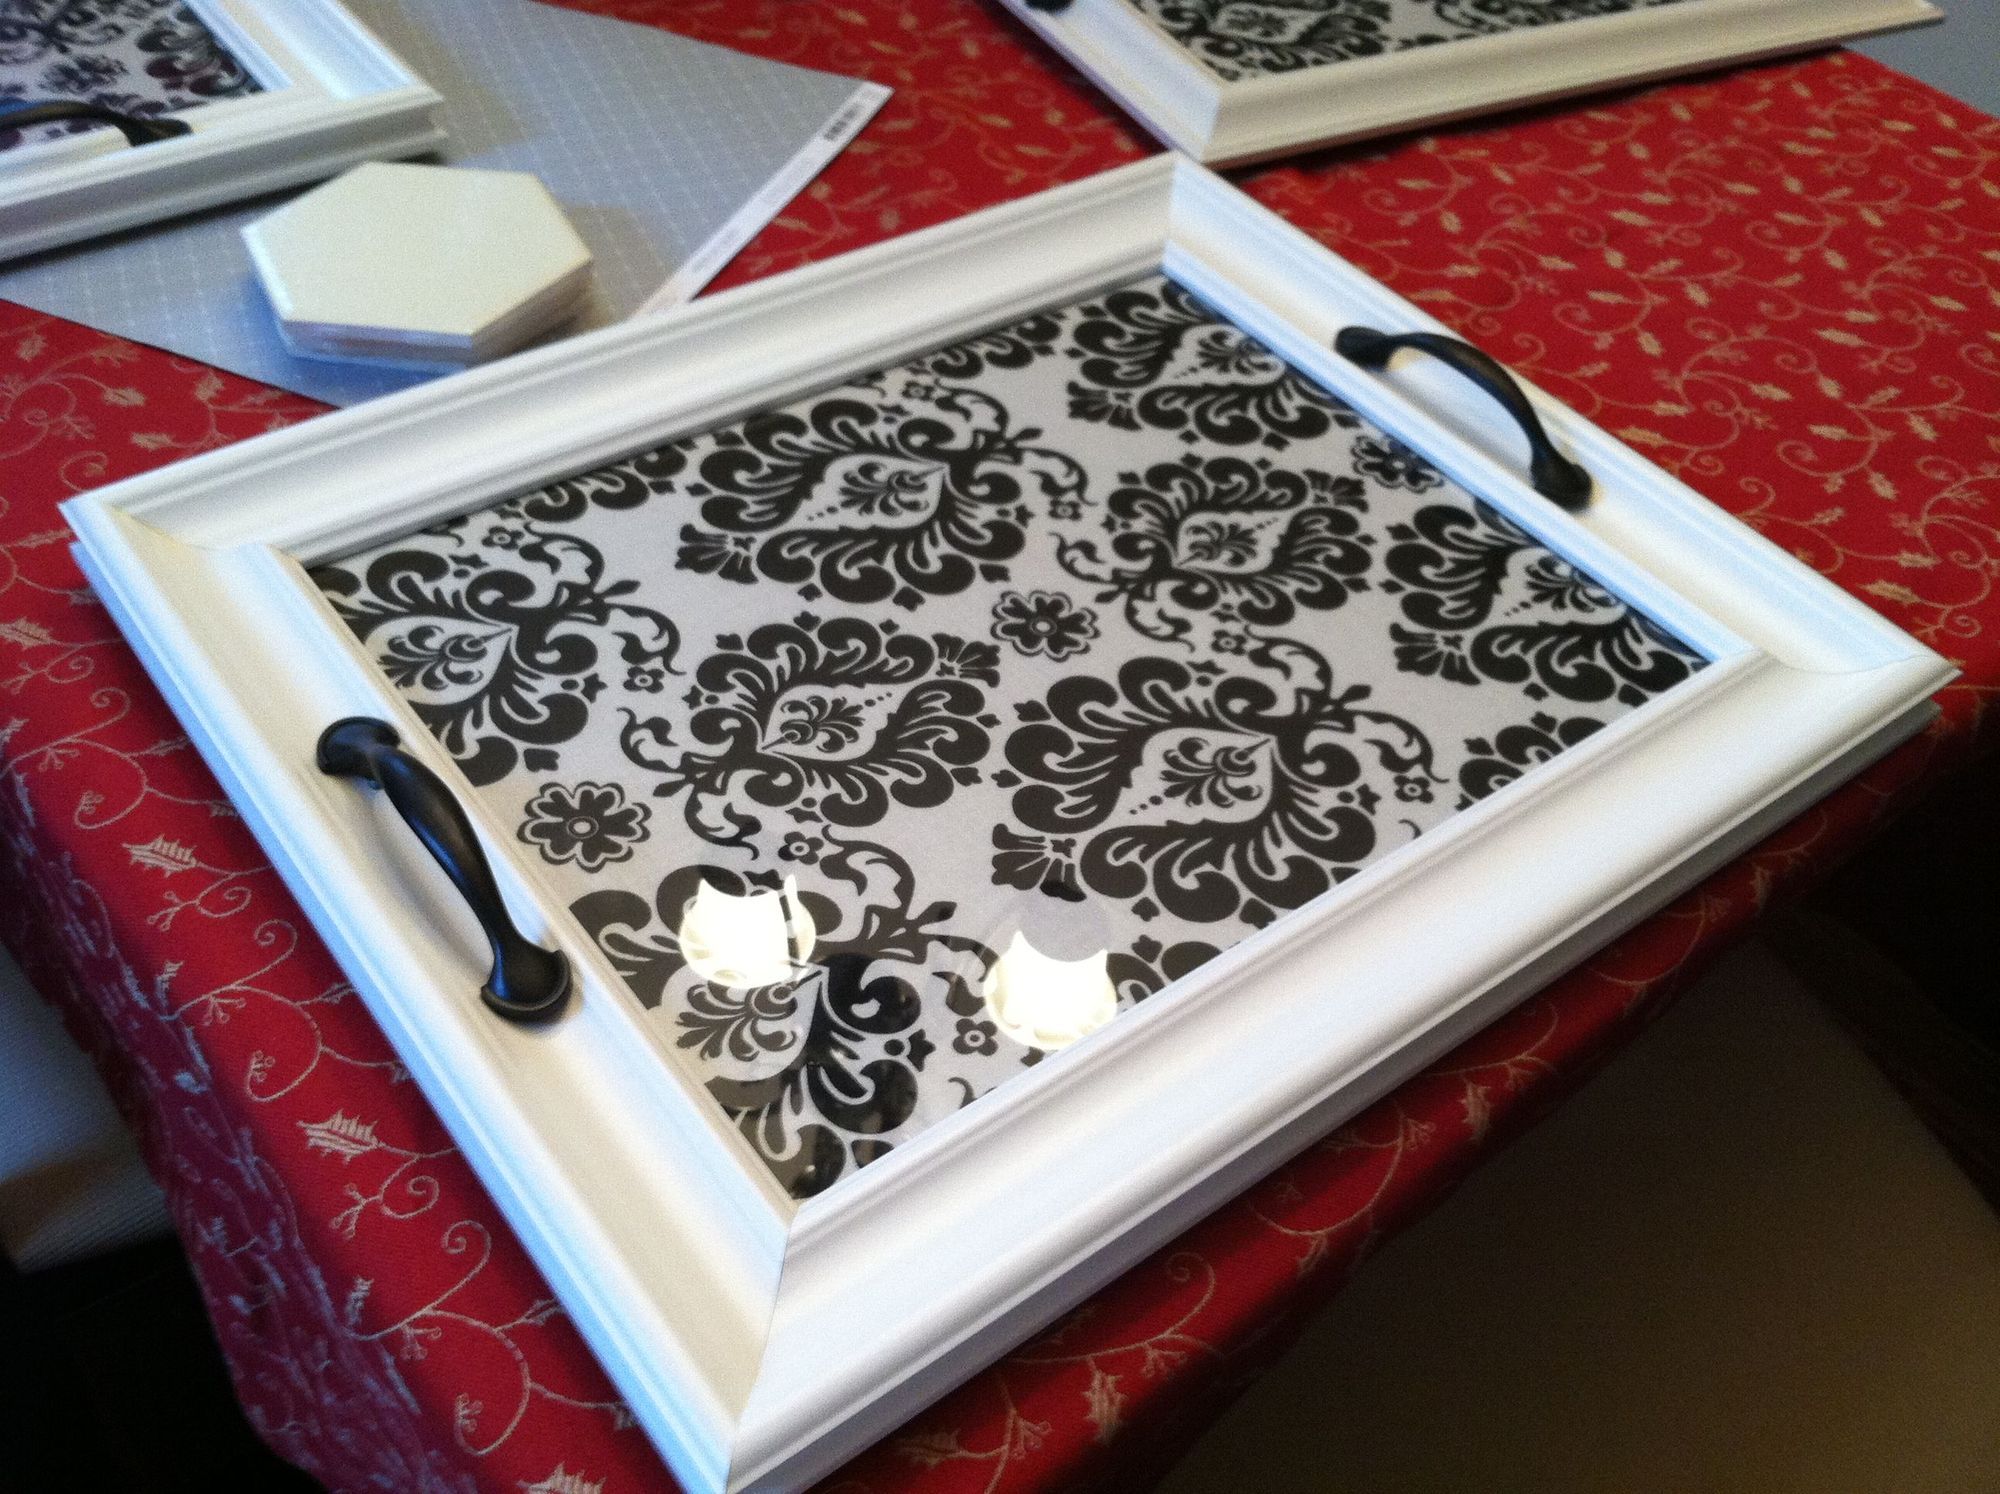
You will need the following items:
- Photo Frame
- Paints
- Plastic curve Handles
- Small Screws
Best out of Waste Steps for Converting an old photo frame into a tray:
- Ask your kid to paint an old photo frame to make it look fresh.
- Let the frame dry for some time.
- Order a pair of handles to connect them to the sides.
- Your tray is ready.
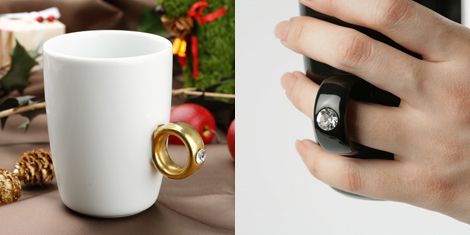
11. Cup Ring
You will need the following items:
- 36 cups
- Fevicol
- Spray paint
- Straw ring
Best out of Waste Steps for Cup Ring:
- Apply fevicol to the edge of one cup and paste it on the outer straw ring. Paste 11 other cups in the same way.
- Now allow your kid to create another circle inside the earlier ring. Kids have to place a cup between two cups. Keep repeating the same process until you have 12 equally spaced cups.
- Build the third ring by placing the leftover cups in a circle.
- Color the ring of your choice. Let it dry.
12. Tin Can Chimes
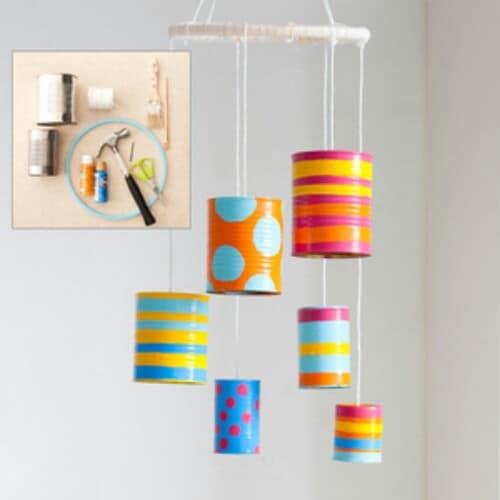
You will need the following items:
- Tin cans in different shapes and sizes
- Paintbrushes
- Paints
- Glitter
- Nail and hammer
- String
Best out of Waste steps for Tin Can Chimes:
- Ask your kid to paint the cans in various colors.
- Sprinkle glitter on the cans. Leave it to dry.
- Pierce holes at the base of the cans.
- Insert a piece of thread into the holes and tie two washers at the other end of the string inside the tin cans.
- Attach the tin cans in such a way that they overhang each other.
13. Itsy Bitsy Spider
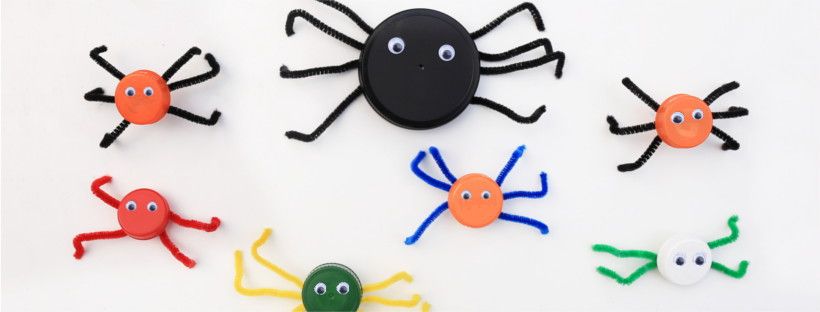
You will need the following items:
- Bottlecap
- String
- Paints and paintbrush
- Glue
- Scissors
- Paper
- Eyes/Buttons
Best out of Waste Steps for Itsy Bitsy Spider:
- Paint the bottle cap in any color you want.
- Cut eight strings in equal lengths.
- Paste 4 strings on both sides of the cap.
- Now stick two eyes or buttons.
- Your Itsy Bitsy spider is ready.
14. CD Coasters
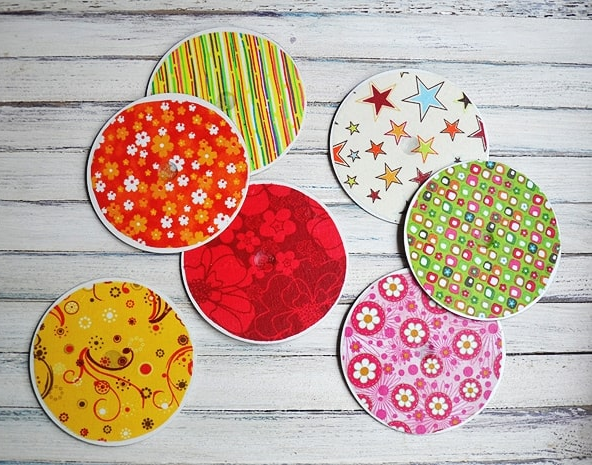
You will need the following items:
- CD
- Cardboard
- Pen or pencil
- Scissors
- Glue
- Fabric
Best out of waste steps for CD Coasters:
- Draw the frame of the CD with a pencil on the cardboard and cut it out. You need two circles for each coaster you make.
- Glue the cut-out cardboard circles on every side of the disk to shut the center hole.
- Paste the top of the cardboard.
- Your CD coasters are ready to use.
15. Turtle made with Walnut Shells

You will need the following items:
- Cardboard
- Walnuts
- Paints
- Scissors
- Tape
- Black marker
- Fevicol
Best out of Waste steps for Walnut Shells:
- Paint half the walnut in yellow color. Once that is dried, paint the details of the shell with green color paint.
- Draw the bottom of a turtle on a full green sheet. Make two and cut them.
- Paste both together in a triangle shape for the face of the turtle.
- Stick the walnut on the base, and make eyes and a mouth. Your turtle is ready.
16. Bear mask with paper plates
You will need the following items:
- Large paper plates
- Brown paint
- Scissors
- Paintbrushes
- Fevicol
- String
Best out of Waste Steps for Bear mask with paper plates:
- Firstly, measure your kid’s eyes and make two holes on the paper plate using those measurements.
- Paint the paper plates in brown color.
- Cut two circles of brown color to make the ears of the bear and also two circles smaller in size for the inner side of the ear of the bear.
- Similarly, make the eyes with white color paper. Cut out brown paper for mouth and nose.
- Paste all the cutouts for forming the face of the bear on the paper plate.
Make two holes on the sides of the paper plate and attach a string to it. Make sure the string fits in your kid’s head.
17. Match-Bot
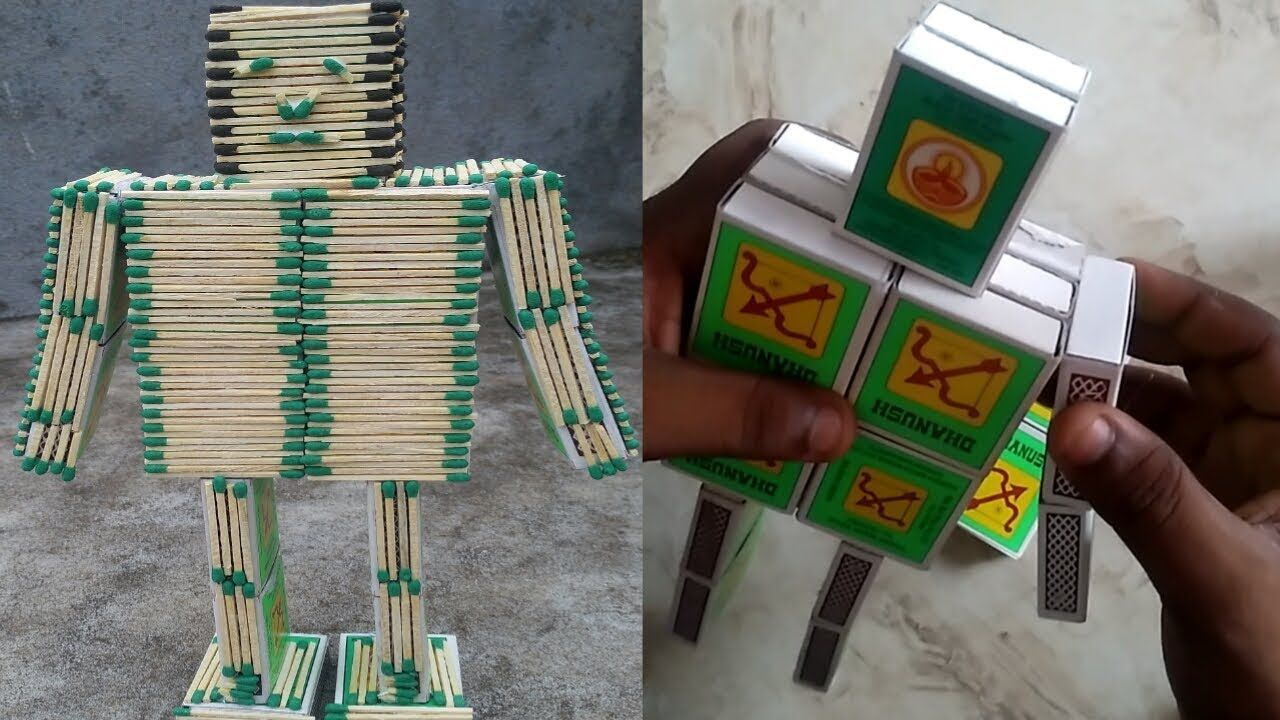
You will need the following items:
- Four matchboxes
- Two matchsticks
- Colored sheets
- Scissors
- Glue
Best out of Waste Steps for Match-Bot:
- Cover the matchbox with any colored paper.
- Pierce a hole at the bottom of the matchbox.
- Make the robot’s aerials using two matchsticks.
- Let your kid make the eyes of the robot.
- Your match-bot is ready.
18. Mini Suitcase for Dolls
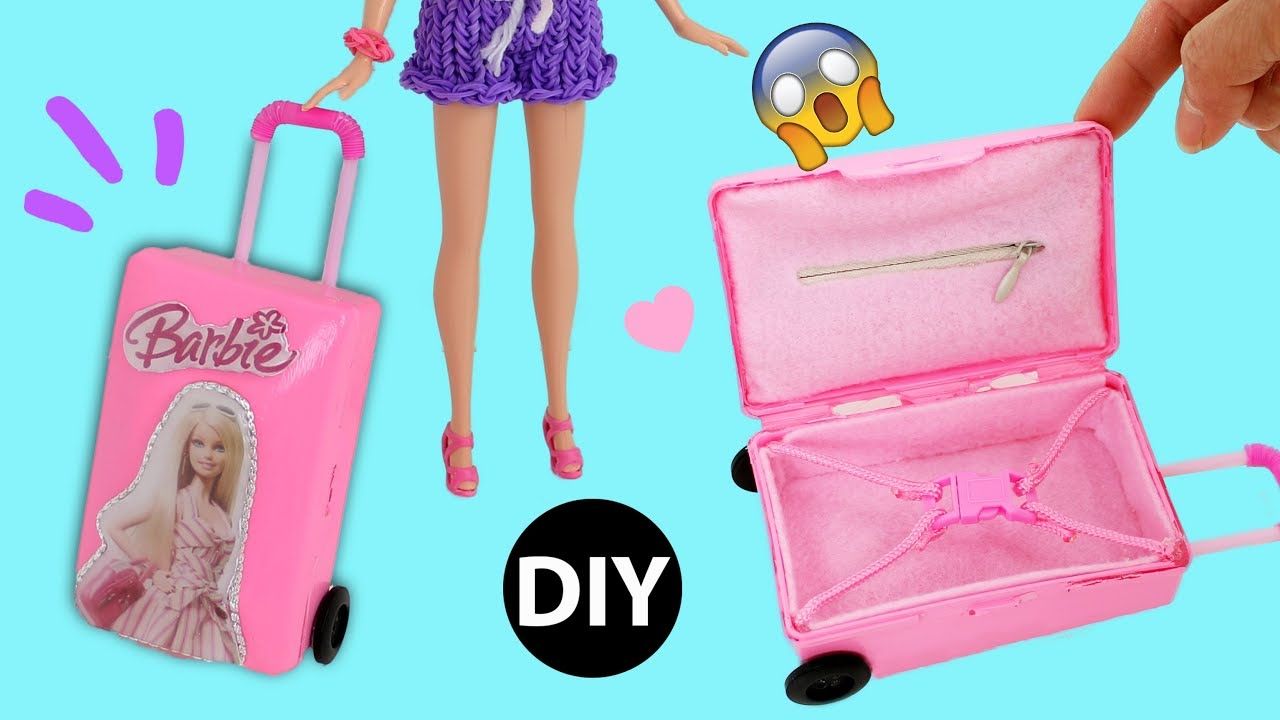
You will need the following items:
- Matchboxes
- Colored papers
- Scissors
- Glue
- Colored pens
Best out of Waste Steps for Mini Suitcase for Dolls:
- Cover the matchbox top with a dark color paper
- Cut pieces of paper and stick them on the sides.
- Decorate your matchbox.
- Make a handle and stick it on top.
- Your Mini Suitcase is ready.
19. Popsicle Photo Frame
You will need the following items:
- Popsicle sticks
- Scissors
- Glue
- Paint
- Crayons
- White paper
Best out of waste steps for Popsicle photo frame:
- Paint the popsicle sticks on both the right and left side
- Place them until they form a square shape, with the ends jutting out on the four sides
- Cut a dimension marginally bigger than white paper. Glue the white paper firmly holds the popsicle.
- Your frame is ready for a photograph, hand-made painting, or drawing!
20. Bottle Piggy Bank
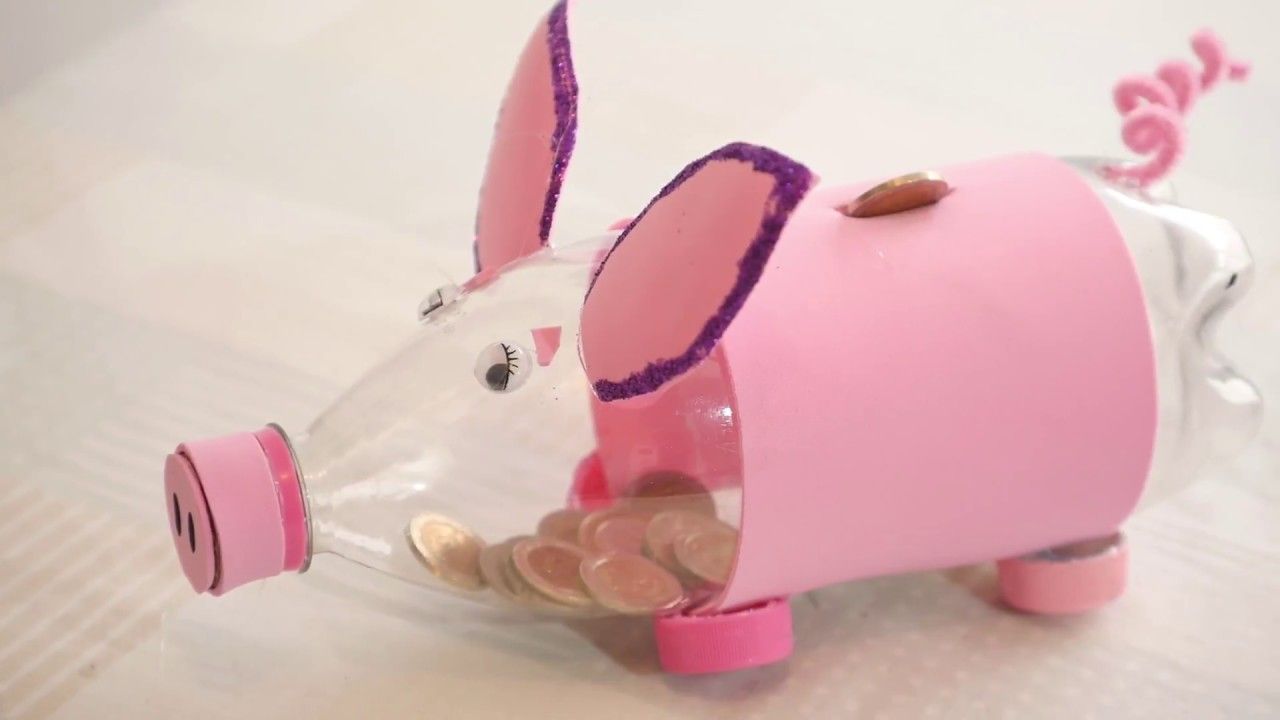
You will need the following items:
- Plastic bottle
- Piece of paper (Be creative with your newspaper choice)
- Felt pens
- Glue
Best out of waste steps for bottle piggy bank:
- Wash the bottle and dry it.
- Cut one hole wide enough on the side of the bottle to bring a coin into.
- To avoid any cracking, seal the edges with adhesive paper or tape.
- Fill the paper with the remainder of the container, and paint or make shapes.
- You can also pull it out and make it look like a pig with only the same pure sticking material.
- Your bank is ready for money.
21. Paper cup windmill
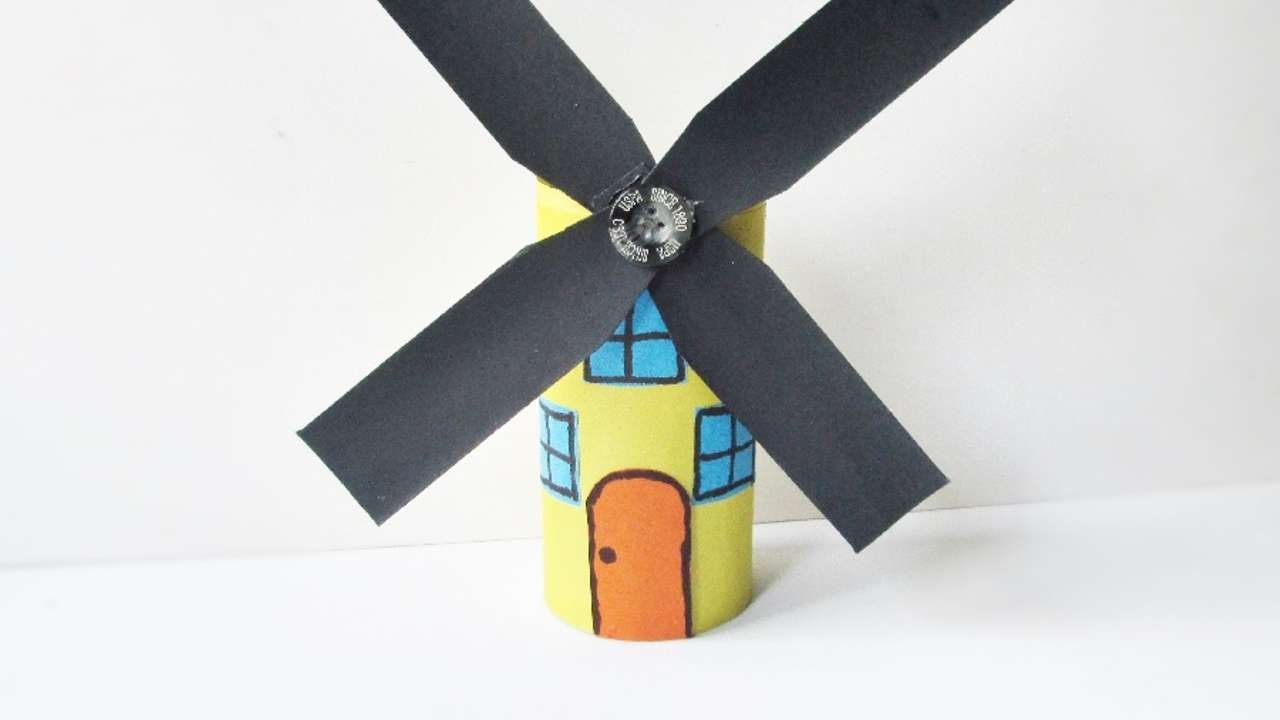
You will need the following items:
- Paper cups
- Whitepaper
- Board pins
- Glue
- Scissors
- Paint
Best out waste steps for paper cup windmill:
- Paint the cups of paper in bright colors
- Place them on top of each other and glue them to build a stack.
- Use paper to make a pinwheel and fasten it with a pin to the top cup.
- You’ve got your windmill.
22. Abstract Alligator
You will need the following items:
- Wooden cloth clip
- Glue
- Scissors
- White paper
- Sketch pens
- Paints
Best out of Waste Steps for Abstract Alligator:
- Color the cloth clip green.
- Draw the teeth of an alligator on white paper and cut them out.
- Paste those teeth on either side of the clip.
- Draw the eyes and nose of the alligator.
- Your Abstract Alligator is ready.
23. T-Shirt Tote Bag
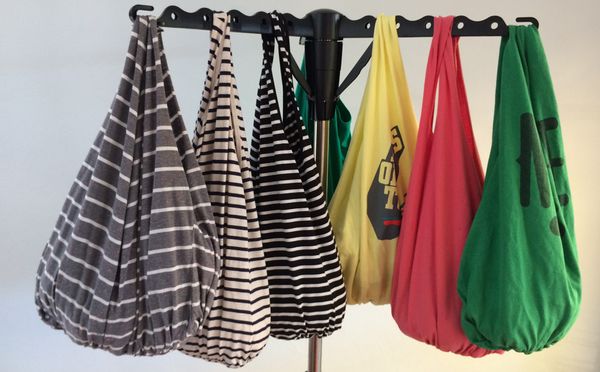
You will need the following items:
- An old t-shirt
- Scissors
Best out of Waste Steps for T-Shirt Tote Bag:
- Cut a circle near the neck of the T-shirt.
- Cut off the sleeves of the shirt equally
- Reverse the T-shirt inside out.
- Cut off the edge at the base of the T-shirt.
- Make margins of 5 cm at the foot of the T-shirt and tie two of these together in bunches. Tie all of them.
- Reverse the T-shirt again.
24. Egg Carton Coffee Garden
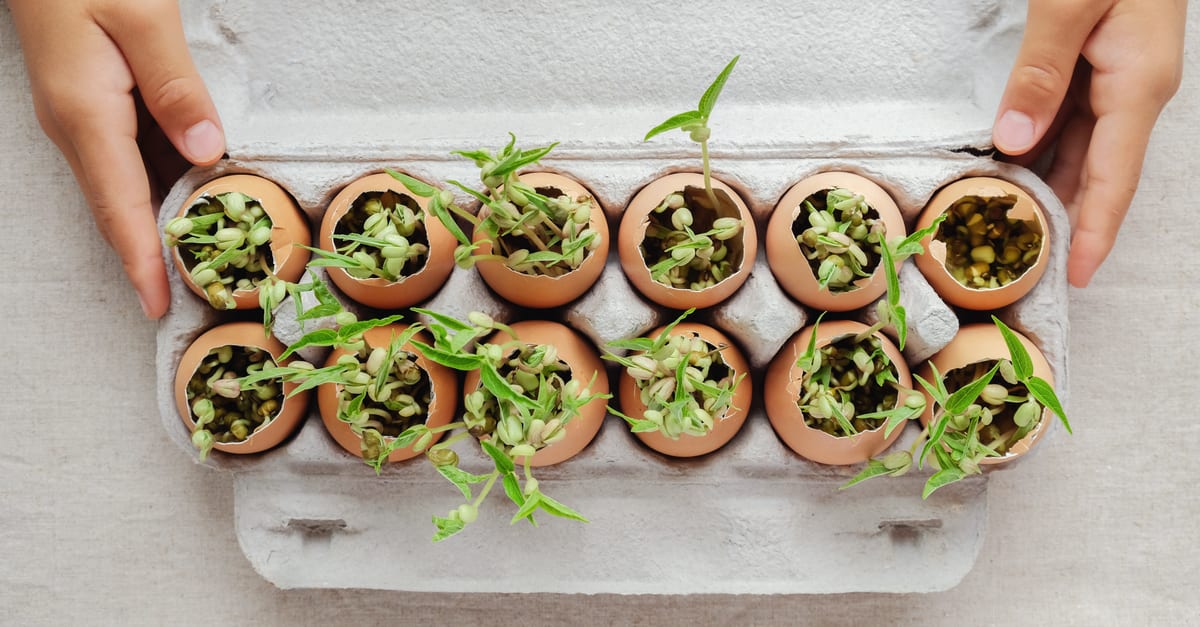
You will need the following items:
- Empty egg carton
- Empty eggshell halves
- Coffee seeds/soil
- Soil
- A pair of scissors
- Toothpicks (optional)
- Small strips of paper (optional)
Best out waste steps for egg carton coffee garden:
- Mix your coffee grounds with soil and leave it aside
- Fill the shells with soil around 1⁄3 full.
- Plant the seeds/plant shoots.
- Pour some water over it.
- For each herb, you can make labels.
- Place the stickers on the toothpicks and fasten them in their respective slots.
- See herbs rise.
25. Paper cup lights
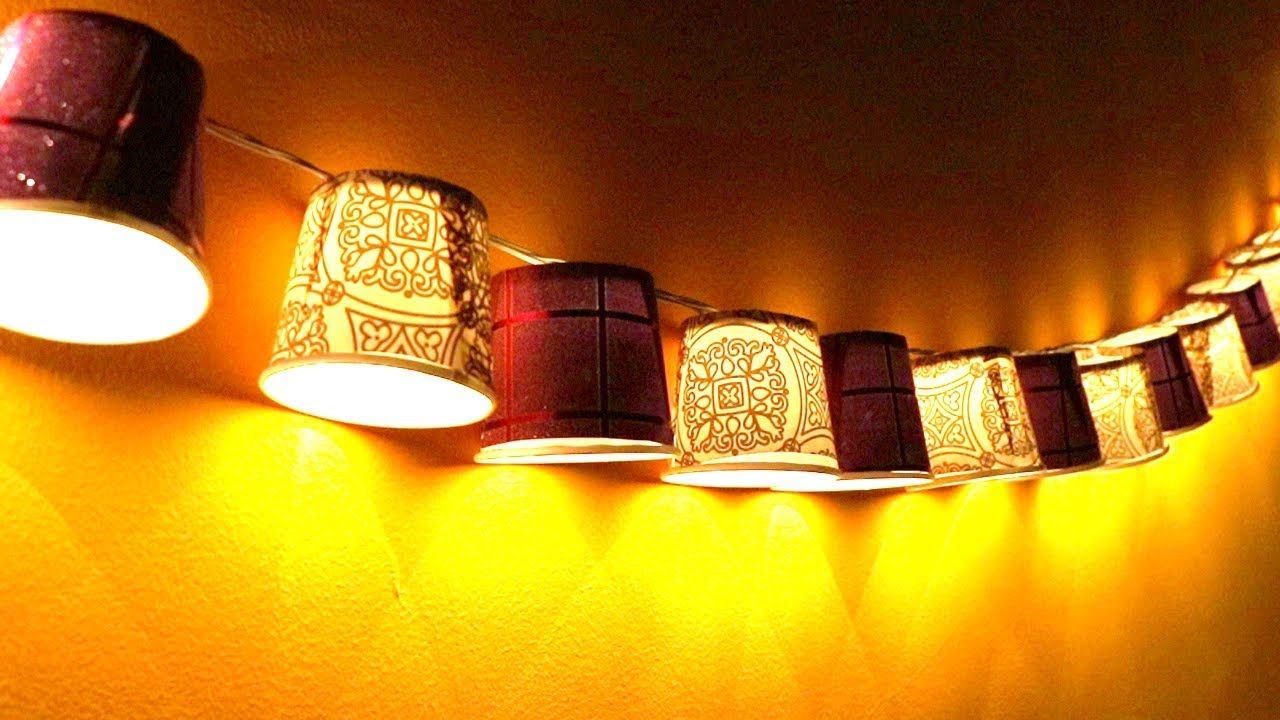
You will need the following items:
- Paper cups
- Paint
- Fairy lights
Best out of waste steps for paper cup lights:
- Take the paper cups and put two X-shaped slits on the bottom of each cup.
- Color the cups and hold them to dry away.
- Placed the Led light bulbs into each slit until they had been cleaned.
- Your Paper cup lights are ready.
26. Tennis Ball Key Holder
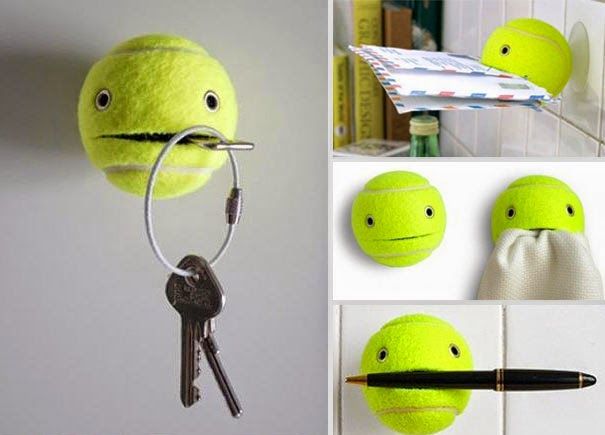
You will need the following items:
- Tennis ball
- Cutter
- Googly eyes
Best out of Waste for Tennis Ball Key Holder:
- Make a slit in the tennis ball. This slit will be the mouth of the ball.
- Attach two eyes just above the slit, so the ball looks like a face.
- Your Tennis Ball Key Holder is ready.
27. Popsicle Storage Box
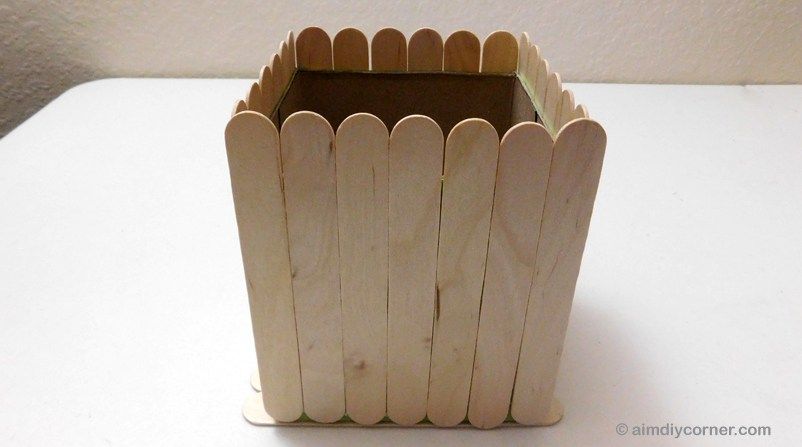
You will need the following items:
- Popsicle Sticks
- Glue
- Paints
- Two pieces of paper – 5×5 inch
Best out of Waste for Popsicle Storage Box:
- Using the piece of paper, make the base of the popsicle storage box. Stick the popsicles all across to form a flat bottom.
- Continue sticking popsicles on the edges until you achieve the box's desired height.
- Paint the box and let it dry.
- Make the lid of the storage box using square paper and paste popsicles all over it.
- Join all the elements and paint the box lastly.
28. Paper Garland
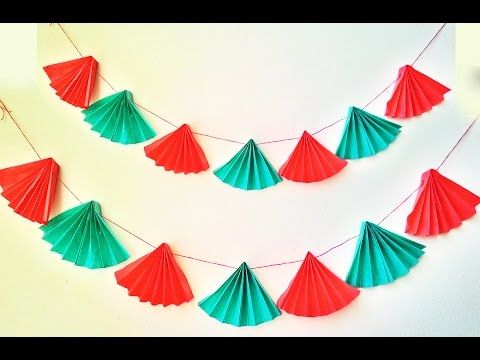
You will need the following items:
- Paper cuttings
- Tape or glue
- Wool
- Scissors
Best out of Waste steps for Paper Garland:
- Cut the paper in different sizes and shapes.
- Attach the paper cutouts to a thread of wool. You can fix this by using tape or glue.
- Your paper garland is ready.
29. Milk Carton Bird House
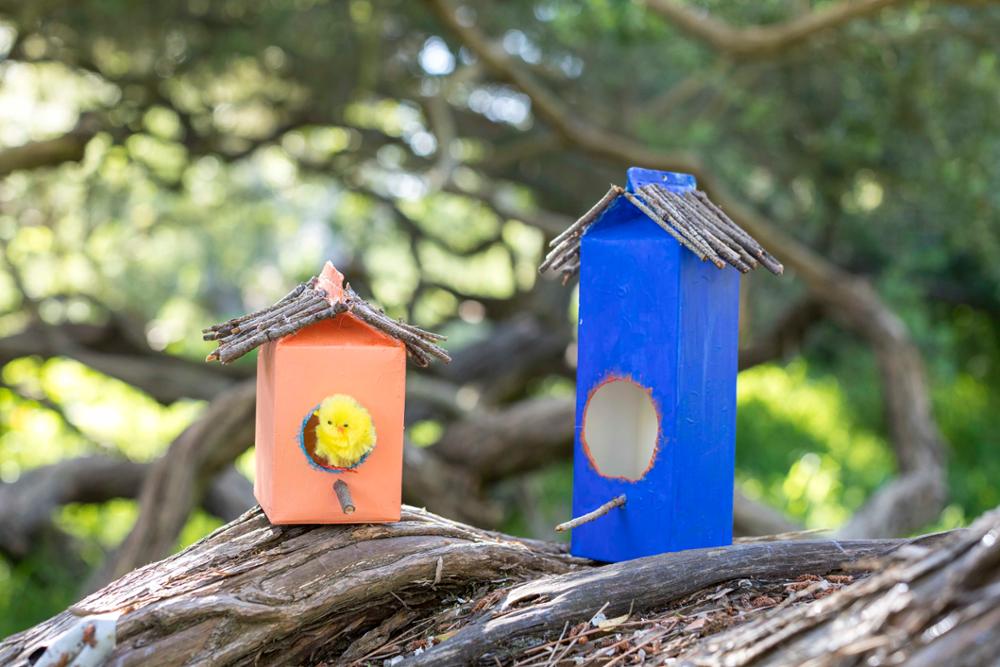
You need the following items:
- Milk carton
- Juice carton
- White spray paint
- Glue
- Knife
- Sponge brushes
- Soft book cover for the roof
- Wool
Best out of waste steps for Milk Carton Bird House:
- Sprinkle the white paint on a milk carton. Let it dry.
- Mix glue with water and apply all over the carton using a paintbrush.
- You can allow your kids to paste paper pieces on the carton when the glue is still wet.
- Make a hole at the top of the carton using a knife.
- Make the opening of the door.
- Below the door, cut an X shape and insert a spoon that can be used to keep the bird food.
- Attach the roof made out of the book cover above the carton.
- Use a thread to tie the Birdhouse.
30. Plastic Bottle Pencil Box
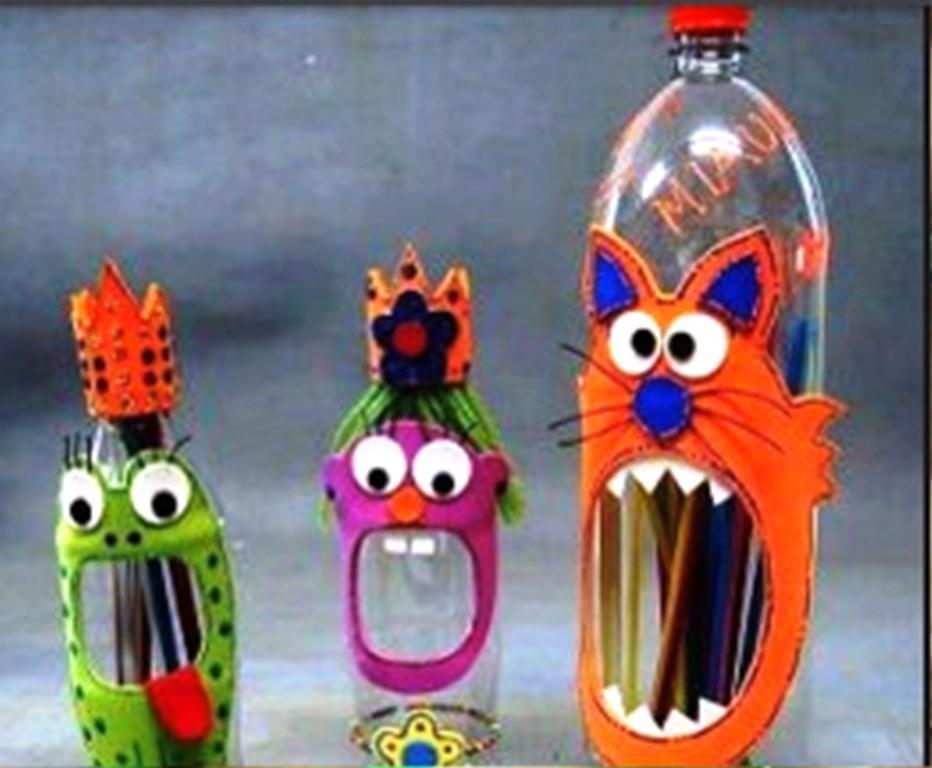
You will need the following items:
- Plastic bottle
- Glue
- Zip set
- Scissors
- Stationery cutter
Best out of waste steps for plastic bottle pencil box:
- Let’s get started! Take plastic bottles and remove their stickers. If sticky places remain after removal, rub them with a solvent to remove the varnish.
- Cut the top of the bottle with the cutter box. Don’t think about being too accurate; you’ll cut the bottle down shorter in the next stage.
- To round out the top, carry scissors. Continue to trim until you hit the height you want. No jagged lines are left. Seek to render a bottle with a regular pen or pencil not shorter than half height.
- Use glue to place a portion of the zipper at the top of the bottle
- Take the rest of the part of the plastic bottle and glue it.
- Our plastic bottle pencil box is ready.
31. Socks Snowman
Do you have some socks which have lost their companions? Or perhaps one got torn, and another remains in your drawer, then you can put them to better work by making a Sock Snowman.
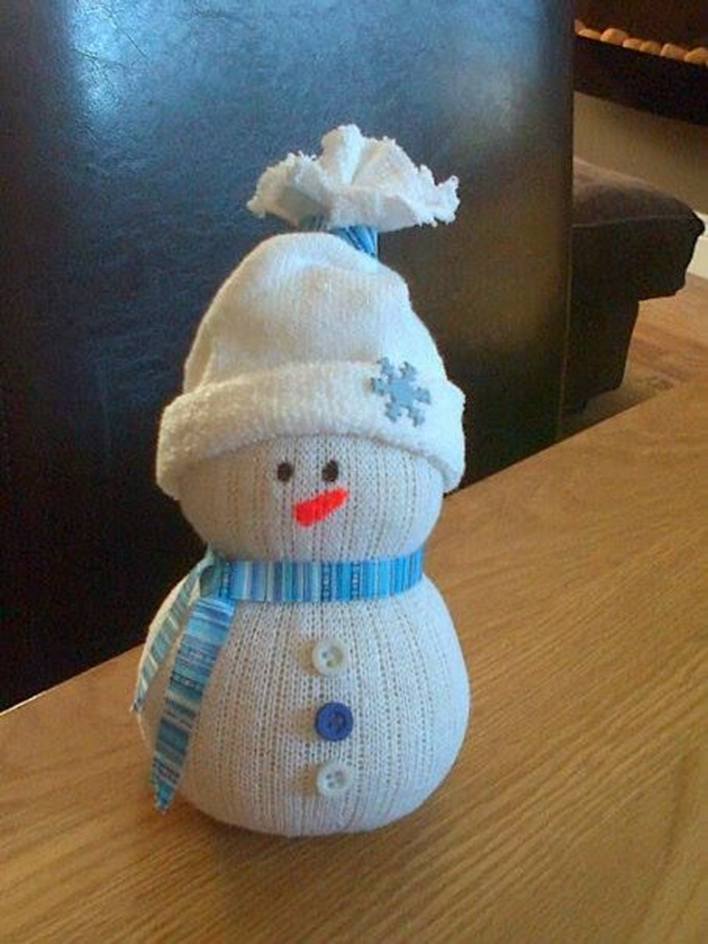
Which wastes do you require:
- 1 of the two socks in the pair
- Sesame seeds
- Rubber bands
- Map pins
- Scissors
- Glue
- Buttons
- Fabric or a bow in a bow
What are we to make of this stuff?
- The white sock should be cut in half lengthwise.
- It should then be stuffed with sesame seeds after being turned inside out.
- Construct a beautiful round foundation, then use a rubber band to hold the top in place.
- To form the snowman's head, tie another rubber band around the object about 75% of the way up.
- Attach the buttons on the snowman's stomach with some glue.
- Make the mouth and eyes of the creature out of the map pins.
- Make the snowman's hat out of the colored sock by rolling it up.
- Make the snowman's muffler by wrapping the cloth or ribbon around the snowman's neck. Your sock snowman is now ready to be displayed!
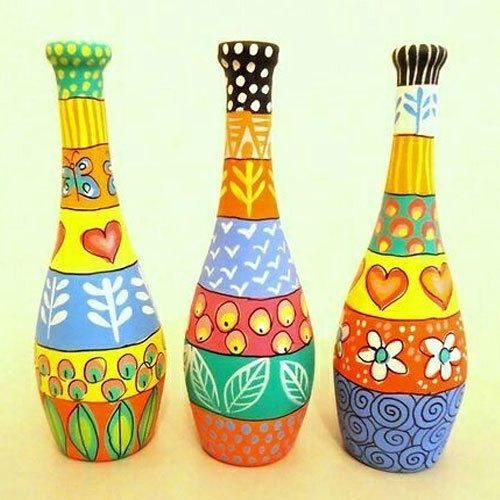
32. Vase Made from Bottles
Make use of those empty soda or water bottles by repurposing them into lovely vases, and you'll be helping the environment in more ways than one.
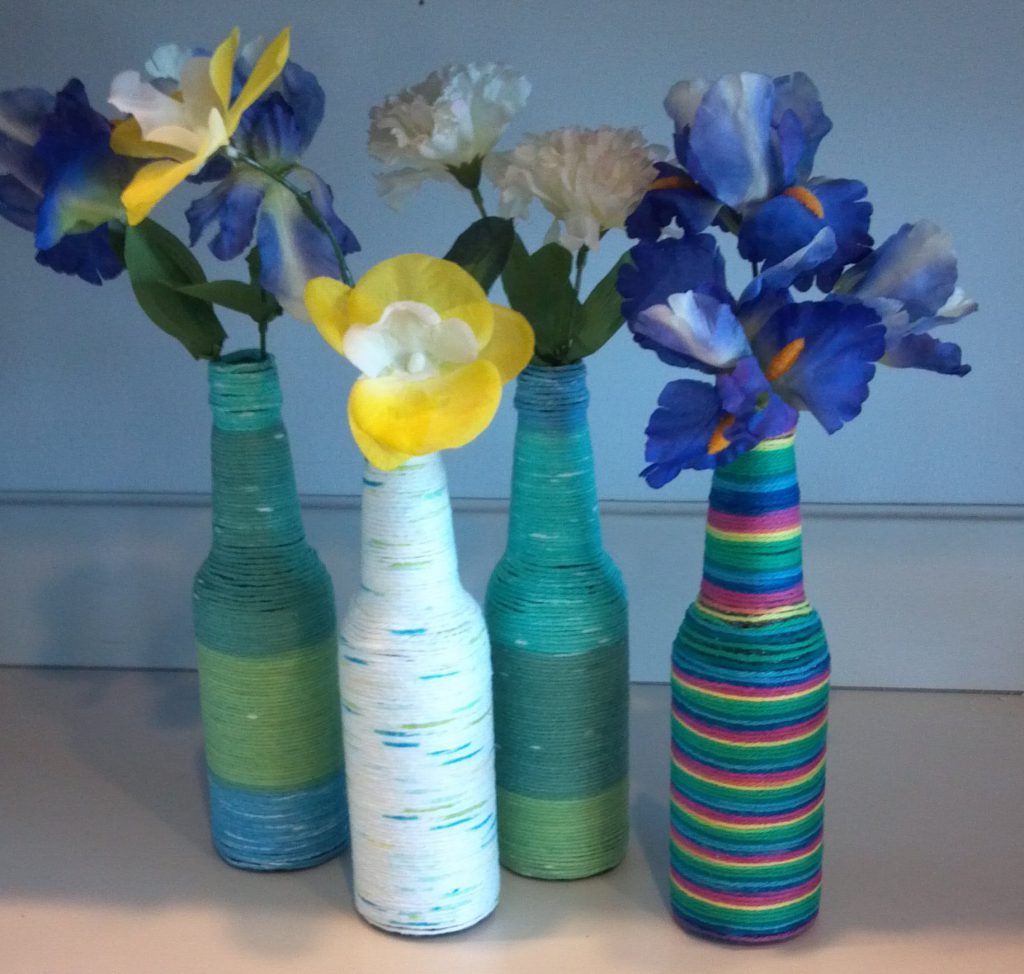
What kind of trash do you have:
- Bottles (glass or plastic)
- Paint
- Paintbrush
- Masking tape (optional)
What are we to make of this stuff?
- Remove the label from the bottle and then wash it thoroughly to clean it.
- Your choice of color should be used to paint the bottle.
- After the first layer of paint has had time to dry, apply a second coat in order to achieve an opaque enough color.
- There is also the option of using masking tape to create bottle designs.
- Change the appearance you wish to paint with the tape first, and then paint it.
- Following painting the bottles, when you pull the tape from that portion of the bottle, it will still be translucent and will have a nice appearance.
- Simply add a flower to your bottle vase, and it will be ready to use as an ornament in your living room.
33. Pineapple-Shaped Pen Stand
Converting an uninteresting plastic water bottle into the pineapple pen holder is an easy way to bring instant cheer to the workspace of your youngster.

What kind of trash do you require:
- Bottle made of plastic
- Green wool
- Green paper
- Tape
- Paints and brushes for painting
- Glue
What are we to make of these situations:
- Yellow paint was applied to the plastic bottle and let to dry.
- Make a pattern of little diamonds by cutting thin strips of green wool and adhering them in a diagonal pattern.
- On a piece of green paper, draw lines in a zigzag pattern.
- Make it look like a pineapple leaf by cutting it out in that shape.
- The leaf should be stuck to the edge of the plastic water bottle. The brand-new pen stand is now ready for use.
34. Bottle Money Bank
Are you interested in learning how to get the most use out of old newspapers? Your children will learn the importance of saving money and reusing containers if you assist them in making a piggy bank out of an empty garbage bottle.
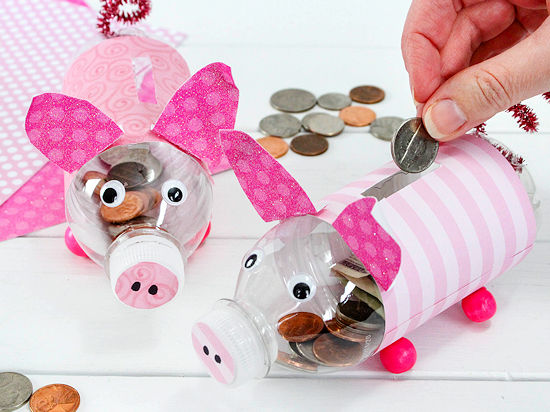
What kind of trash do you require:
- Plastic Bottle
- A single sheet of paper (Be creative with your newspaper choice)
- Felt pens
- Glue
What are we to make of this stuff?
- It is important to wash and dry the bottle.
- Create a slot on the bottle's right side that is large enough to accommodate a coin and cut it out.
- Seal the borders with tape or glue to prevent the paper from tearing.
- Wrap the remaining bottles with paper, then paint them or decorate them with patterns.
- Using the same technique of putting pieces of paper together, you can even make it appear like a pig if you want to go all out.
- Your savings account is all set!


